Master The Art Of Almond Shape Nails: Your Ultimate Guide
Alright, listen up, ladies and gents. If you're here, chances are you're ready to take your nail game to the next level. Let’s talk about how to create almond shape nails—because let’s face it, these babies are the perfect blend of elegance and versatility. Almond nails are not just a trend; they’re a lifestyle. And if you’re wondering why everyone’s raving about them, well, you’re about to find out. So grab your nail file, your favorite polish, and let’s dive in.
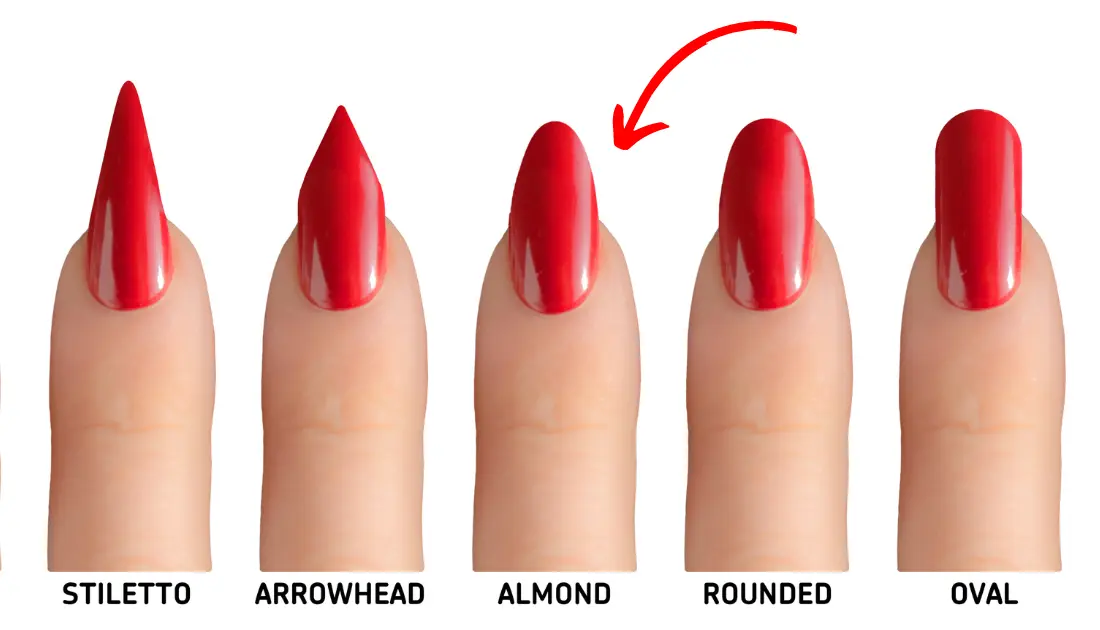
Creating almond shape nails might sound intimidating, but trust me, it’s easier than you think. The almond shape is all about achieving that sleek, oval-like curve that tapers to a gentle point. It’s not too sharp like stiletto nails, nor is it too round like classic nails. It’s the Goldilocks of nail shapes—just right. Whether you’re a beginner or a seasoned pro, this guide will have you rocking almond nails like a boss in no time.
Now, before we get into the nitty-gritty, let’s address the elephant in the room: why almond nails? For starters, they’re universally flattering. They work with almost every hand shape, and they make your fingers look longer and more refined. Plus, they’re super versatile. You can rock them with a simple nude polish or go all out with intricate designs. So, are you ready to level up your nail art skills? Let’s get started.
Why Almond Shape Nails Are the Ultimate Choice
Let’s break it down. Almond nails are basically the holy grail of nail shapes. They’re elegant, sophisticated, and let’s be honest, they make your hands look like they belong on a runway. But what makes them so special? First off, they’re incredibly versatile. Whether you’re going for a natural look or something more daring, almond nails can handle it all. Plus, they’re durable. Unlike super sharp stiletto nails, almond nails are less prone to breaking, which means you can wear them longer without worrying about chipping or cracking.
Another reason almond nails are a top pick? They suit pretty much every hand shape. If you’ve got shorter fingers, almond nails can create the illusion of length. If you’ve got longer fingers, they balance out the proportions perfectly. It’s like they were designed to make everyone feel confident and stylish. And hey, who doesn’t want that?
Tools You’ll Need to Create Almond Shape Nails
Before we jump into the shaping process, let’s talk tools. You don’t need a whole salon setup to create almond nails at home. Here’s a quick list of essentials:
- Nail clippers
- A good quality nail file (preferably a fine grit one)
- Cuticle oil or cream
- A buffer block
- Nail polish or gel polish (optional)
Now, you might be wondering why some of these tools are necessary. Well, here’s the deal: nail clippers help you trim your nails to the right length, while the file is your go-to tool for shaping. Cuticle oil keeps your cuticles hydrated, which is crucial for maintaining healthy nails. And the buffer block? It gives your nails that smooth, shiny finish that makes them look salon-worthy.
Step-by-Step Guide to Creating Almond Shape Nails
Alright, now that you’ve got your tools ready, let’s get down to business. Here’s a step-by-step guide to creating almond shape nails:
Step 1: Trim Your Nails
Start by trimming your nails to the desired length. For almond nails, you’ll want them to be slightly longer than your natural nail line. Don’t go too long, though—you want to maintain that elegant almond shape. Use your nail clippers to trim them evenly, making sure both hands match.
Step 2: File the Sides
Next, grab your nail file and start filing the sides of your nails. You’ll want to create a gentle curve that narrows toward the tip. Think of it like drawing an almond—rounded at the base and tapering to a point. Make sure to file in one direction only to avoid weakening the nail.
Step 3: Shape the Tip
Now it’s time to shape the tip. This is where the almond magic happens. Use your file to gently round off the tip of your nail, creating that signature almond shape. Remember, you’re aiming for a soft point, not a sharp one. Take your time and check both hands regularly to ensure they’re symmetrical.
Step 4: Buff and Shine
Once you’ve got the shape you want, it’s time to buff your nails. Use a buffer block to smooth out any rough edges and give your nails that glossy finish. This step is optional, but trust me, it makes a huge difference in the overall look.
Step 5: Add Polish
Finally, if you’re feeling fancy, add a coat of your favorite nail polish. Whether you go for a classic nude or something bold and bright, the choice is yours. Just make sure to apply evenly and let it dry completely before touching anything.
Common Mistakes to Avoid When Creating Almond Shape Nails
Even the best of us make mistakes, but with a little guidance, you can avoid the common pitfalls when creating almond nails. Here are a few things to watch out for:
- Filing too aggressively: Take it slow and steady to avoid damaging your nails.
- Making the tip too sharp: Remember, almond nails are all about that soft point. Keep it gentle.
- Not maintaining symmetry: Regularly check both hands to ensure they’re evenly shaped.
By avoiding these mistakes, you’ll be well on your way to perfecting your almond nails.
How to Maintain Almond Shape Nails
Creating almond nails is one thing, but maintaining them is another. Here are a few tips to keep your nails looking fresh:
- Moisturize regularly: Keep your cuticles and nails hydrated to prevent cracking.
- File as needed: If your nails start to grow out, gently file them to maintain the shape.
- Avoid harsh chemicals: Limit exposure to cleaning products and other harsh chemicals that can damage your nails.
With a little TLC, your almond nails will stay looking fabulous for weeks.
Almond Shape Nails vs Other Nail Shapes
So, how do almond nails stack up against other popular nail shapes? Let’s take a quick look:
Square Nails
Square nails are strong and durable, making them a great choice for those who need practicality. However, they lack the elegance of almond nails.
Oval Nails
Oval nails are similar to almond nails but lack the pointed tip. They’re great for a softer, more rounded look, but they don’t have the same elongating effect as almond nails.
Stiletto Nails
Stiletto nails are all about drama, with their sharp, pointed tips. While they’re super stylish, they’re also more prone to breaking. Almond nails strike the perfect balance between style and durability.
Tips for Beginners Trying Almond Shape Nails
If you’re new to shaping your nails, here are a few tips to help you out:
- Start with short nails: If you’re unsure about the length, start with shorter nails and gradually extend them.
- Practice makes perfect: Don’t get discouraged if your first attempt isn’t perfect. Keep practicing, and you’ll get the hang of it in no time.
- Watch tutorials: There are tons of great tutorials online that can walk you through the process step by step.
Remember, everyone starts somewhere. With a little patience and practice, you’ll be creating almond nails like a pro in no time.
Professional Techniques for Creating Almond Shape Nails
If you’re looking to take your almond nail game to the next level, here are some professional techniques to try:
- Use a stencil: Some nail artists use stencils to ensure perfect symmetry when shaping almond nails.
- Experiment with gel or acrylic: If you want longer-lasting results, consider using gel or acrylic nails to achieve the almond shape.
- Try nail art: Once you’ve mastered the shape, why not get creative with nail art? From simple designs to intricate patterns, the possibilities are endless.
These techniques can help you elevate your almond nails to salon-quality status.
The Psychology Behind Almond Shape Nails
Believe it or not, there’s actually some psychology behind why almond nails are so popular. The almond shape is inherently pleasing to the eye. Its gentle curves and soft point create a sense of balance and harmony. Plus, the elongated shape gives the illusion of longer, more elegant fingers, which is why so many people find them so appealing.
So, the next time someone compliments your almond nails, you can thank both the shape and the science behind it.
Conclusion: Why Almond Shape Nails Are Here to Stay
And there you have it, folks. Almond shape nails are not just a passing trend—they’re here to stay. With their versatility, elegance, and durability, they’re the perfect choice for anyone looking to upgrade their nail game. Whether you’re a beginner or a seasoned nail artist, almond nails are a great way to express your style and confidence.
So, what are you waiting for? Grab your tools, follow the steps, and start creating those almond nails today. And don’t forget to share your masterpiece with us in the comments below. We’d love to see how your nails turn out!
Table of Contents
- Why Almond Shape Nails Are the Ultimate Choice
- Tools You’ll Need to Create Almond Shape Nails
- Step-by-Step Guide to Creating Almond Shape Nails
- Common Mistakes to Avoid When Creating Almond Shape Nails
- How to Maintain Almond Shape Nails
- Almond Shape Nails vs Other Nail Shapes
- Tips for Beginners Trying Almond Shape Nails
- Professional Techniques for Creating Almond Shape Nails
- The Psychology Behind Almond Shape Nails
- Conclusion: Why Almond Shape Nails Are Here to Stay
Lee Min Ho Engaged: The Buzz, The Truth, And Everything In-Between
State Quarters Checklist: The Ultimate Guide To Collecting All 50 Pieces
Kickoff Affiliate Program: Your Ultimate Guide To Boosting Your Earnings

How To Shape Almond Nails The Easy and Most Effective Way

How To Shape Almond Nails The Easy and Most Effective Way
How to Achieve the Perfect Almond Nail Shape Lovely Nails And Spa
